Last month I did an RJW solo game using Battles for Empire (BFE). Last week I played the same game using Contemptible Little Armies 2nd Edition (CLA). Last night I did the same scenario using Future War Commander (FWC).
FWC is a set of sci-fi from
Specialist Military Publishing who also publish Blitzkrieg Commander for WW2 and Cold War Commander for modern warfare. All 3 sets are based on Games Workshop's Warmaster rules.
I imagine there are a few raised eyebrows at using a set of Sci-Fi rules to refight a battle from the early 20th century. However FWC is a very flexible if abstract set of rules so basically regard the two forces as very-very-low-tech armies.
I must admit I am a very big fan of FWC and will consider using for most periods involving firearms. I have used it previously for French vs Austrians in 1859. Our local club also runs an annual
FWC Bootcamp
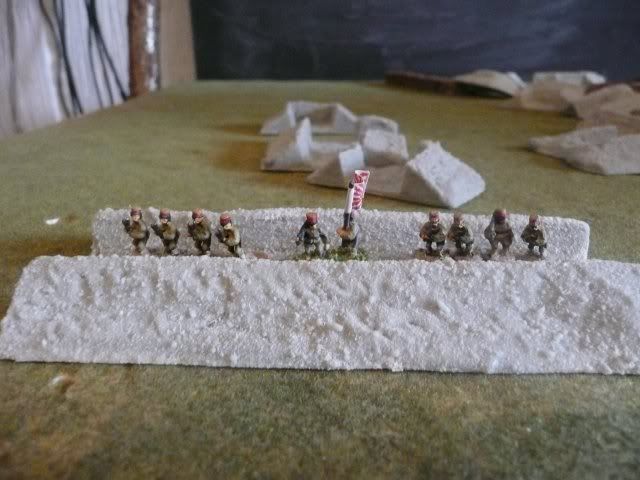
The scenario is played out on a 2 foot terrain tile with 3 Japanese Battalions assaulting a single entrenched Russian battalion. The Russians also have 2 HMGs and 2 Field guns on a low ridge behind the trench-line so that they can provide overhead fire support until the Japanese get too close
For those not familiar with FWC the key to the game is the Command Value of a Command unit. The Command Value (CV) is usually in the range 7 to 10 with 7 being bad and 10 being good
Command units give order to troops under them by rolling their CV or less on 2D6. If they roll their CV then the troops carry out the orders otherwise that's it for that turn. A Command Unit can continue issuing order in the same turn as long as it passes it's CV - once it fails then that Command unit has to wait until next turn. CVs are modified by -1 for each extra order given to a unit and by the distance from the Command unit to the troops being ordered
There are only 2 orders in this game - move or shoot
Troops have several statistics, movement, attack, assault, hits & save - all measurements are in cm
Attack is for ranged weapons and is shown as number of dice / range so 3/30 is 3D6 upto 30cm ,Assault is the number of dice used in Close Combat ,Hits is the number of hits a unit can take and Save is the score required to negate hits
Ranged Attacks can be ordered or can be carried out as opportunity or initiative fire. Opportunity fire takes place in an opponent's turn and can be used against any unit that moves or shoots, Initiative fire takes place at the start of your turn if enemy troops are within Initiative range - usually 20cm - basically it is a free order. A unit can also move with initiative. However if a unit opportunity fires or fires or moves in the Initiative phase then it is a -1 to the CV roll.
If a unit shoots then it rolls it's Attack dice and requires 4,5 or 6 to hit - this is modified by -1 for soft cover and -2 for trenches.
If there are any hits then the unit hit can roll to save each one - usually 6. If the number of unsaved hits equals or exceeds the unit's Hit value then it is destroyed otherwise the unit is marked as having that number of hits and has to roll a dice for each unsaved hit to see if it is Suppressed - this is the same number as required to hit. Suppressed means that a unit can't do anything until the end of it's turn.
Simples!
The Russian stats are...
| Quantity | Troops | Arm | Move | Attack | Assault | Hits | Save | Points | Cost |
1 | CO (CV8) | cmd | 60 | 3/30 | | 6 | 6 | 90 | 90 |
1 | HQ (CV8) | cmd | 60 | 3/30 | | 6 | 6 | 60 | 60 |
12 | Infantry Unit (Regulars) | inf | 10 | 2/30 | 4 | 4 | 6 | 20 | 240 |
2 | Support Unit (MG, Maxim) | inf | 10 | 3/60 | 2 | 4 | 6 | 55 | 110 |
2 | Support Unit (IG, 76mm) | inf | 10 | 3/80 | 2 | 4 | 6 | 70 | 140 |
This gives a force of 640 points. The Russians have a Rigid Tactical Doctrine which reduces their Command & Initiative Range to 15cm but if all units are given the same order then it is +1 to the CV. They are also classed as Stubborn which means that they drop a Suppression dice and won't retreat.
The Russians split their force into a Left wing under the CO and a Right Wing under the HQ with a gun & HMG supporting each wing.
The Japanese stats are ...
| Quantity | Troops | Arm | Move | Attack | Assault | Hits | Save | Points | Cost |
1 | CO (CV9) | cmd | 60 | 3/30 | | 6 | 6 | 130 | 130 |
2 | HQ (CV9) | cmd | 40 | 2/30 | | 4 | 6 | 100 | 200 |
36 | Infantry Unit (Regulars) | inf | 10 | 3/30 | 4 | 4 | 6 | 30 | 1080 |
This gives a force of 1410 points. The Japanese have Normal Tactical Doctrine which gives them a Command & Initiative Range of 20cm. They are also classed as Assault Troops which means they must use initiative to assault the enemy and there is no command penalty for assaulting.
The CO took the 1st Battalion in the centre with the HQs taking 2nd Battalion on the Left and 3rd Battalion on the Right.
On with the game - Turn 1 saw the Russians open up with their HMGs and Field guns killing 1 base from 3rd Btn and suppressing a base from 2nd Btn. This must have spurred on 3rd Btn because they rolled 4 orders ending up just in front of the Russian trenches and getting opportunity fire from the Russians. 1st and 2nd Battalions failed to move (ie rolled more than 9)
In Turn 2 the Russians fail to do anything because a) they had opportunity fired in Turn 1 and therefore could not do Initiative fire and then failed their command roll. The Japanese 3rd Btn had to initiative assault which involves moving the attackers one base at a time - the target base and any unsuppressed bases within 10cm and having line-of-sight can do defensive fire. Therefore each attacker was subject to 3 bases each having 3 dice (2+1 for half range). 3rd Btn lost 6 bases without getting into contact
In the normal Japanese move 2nd Btn no doubt inspired by 3rd Btn advanced rapidly towards the Russian trenches. The Russians don't opportunity fire so that they can fire in the Initiative phase. 1st Btn again fails to move.
Turn 3 starts with both Russian wings doing Initiative fire on the 2nd & 3rd Btns. 3rd Btn gets off without any casualties. 2nd Btn gets a few hits. The Russian Right Wing then roll 3 successive shoot orders against 2nd Btn which kills 4 bases and suppresses 3 more. The Russian Left wing fails to roll it's CV
The Japanese 2nd & 3rd Btns have to initiative assault again with all unsuppressed units which leaves 3rd Btn with no bases and 2nd with only 3 bases.
Finally the 1st Btn decides to move forward and advances on a broad front against the Russians.
Opportunity fire by the Russians kills 2 bases and suppresses 5 more. 1st Btn then charges in and manages to kill 1 Russian unit in close combat. However 1st Btn gets another 4 base killed.
Game over for the Japanese with 26 bases lost to 1 Russian base. The Japanese army would have broken with loss of the 18th base.
Well I didn't see that one coming. I had expected the Japanese to do a little better than they did. However an uncoordinated attack by all 3 Japanese battalions is only going to have one result. Little damage was done to the attackers in the advance - failed CV rolls slowing them down more than Russian firepower. The killer was the compulsory assault in the Initiative phase when the attackers have to go in one by one and defenders can fire several times over.
I would probably replace the Japanese Assault Troop classification with Elite which costs the same but only has the no command penalty for assaulting although the former is more in line with a "man should die as a shattered jewel rather than live as an intact tile".
Nevertheless another interesting game - sorry if I've gone on at length about FWC. My gripes about FWC would be clutter with the various markers ie hits, suppression, opportunity fire etc , the brutal assault rules (yes I know you should only assault if the enemy are suppressed) and the failed command rolls.
Well I've played the same scenario using 3 different rules - I'll have to have a think about which one is the most suitable.
Other photos of the game can be viewed here
photobucket.com/rjw111028